You may greatly improve the scalability and performance of your WordPress website by moving it to AWS. Using Amazon Web Services (AWS) to host your WordPress website gives you access to a dependable, safe, and adaptable cloud environment.
Better uptime, faster load times, and easy scalability as your site expands are just a few advantages. For this, you can take services from our WordPress development company, or do it yourself. To help you transfer your site from WordPress to AWS we will cover all the necessary steps and answer the common question: How to move WordPress to AWS?
Can You Host a WordPress Site on AWS?
Yes, you can host a WordPress site on AWS. Among the services offered by the cloud platform is Amazon EC2, which enables you to set up a virtual server on which WordPress may run. Additionally, AWS provides a range of tools for growing and administering your website with dependability and efficiency. The flexibility to customize your server configurations and the pay-as-you-go pricing model are some of the top advantages of hosting WordPress on Amazon.
Why Move WordPress to AWS?
There are several reasons you might consider moving your WordPress site to AWS:
- Scalability:
As your website grows, AWS makes it easy to scale your server resources without downtime. - Security:
AWS offers advanced security features like firewalls, encryption, and automated backups. - Performance:
You can optimize your AWS server with caching solutions and content delivery networks (CDNs) for faster page load times and improved page visibility. - Reliability:
AWS provides high uptime, ensuring your site remains online even under heavy traffic.
Now, let’s see the steps on how to move WordPress to AWS.
Step-by-Step Guide to Moving WordPress to AWS
1. Launch an EC2 Instance
The first step in the process is to launch an EC2 instance, which acts as the virtual server for your WordPress site. Here’s how to do it:
- Access EC2 Dashboard:
Log in to your AWS account and navigate to the EC2 dashboard. - Click on Launch Instance:
This will begin the process of creating a new server instance. - Search for WordPress:
In the left sidebar of the EC2 dashboard, go to the AWS Marketplace, then to WordPress, and select”WordPress Certified by Bitnami.” - Continue with the Setup:
After reviewing the WordPress details, click the Continue button to move forward with the setup process.
2. Choose Instance Type
Once you’ve selected WordPress from Bitnami, you will need to choose the appropriate instance type. For most small to medium-sized WordPress sites, a t2.micro instance (eligible for the free tier) will suffice. Larger sites may require more powerful instance types like t2.medium or t3.large.
Click “Next” to proceed after selecting your instance type.
3. Configure Instance Details
On the configuration page, you’ll set up various options for your instance. For most setups, you can leave the default options, but here’s what to pay attention to:
- Auto-assign Public IP:
Ensure this option is selected so your WordPress site will be accessible from the web. - Other Options:
Leave these unchanged unless you have specific networking or security requirements.
After configuring, click “Next” to review the instance details.
4. Generate SSH Key and Launch Instance
In this step, you’ll generate an SSH key pair that will allow you to securely access your EC2 instance. Save the private key file on your local machine. After that, click “Launch” to start the instance.
5. Obtain WordPress Credentials
- Go to Instances:
In the EC2 dashboard, locate your new instance and click on its name. - Get System Log:
Click on “Actions,” then “Instance Settings,” and choose “Get System Log.” In the log, locate the Bitnami WordPress application password and copy it.
6. Copy External IP Address
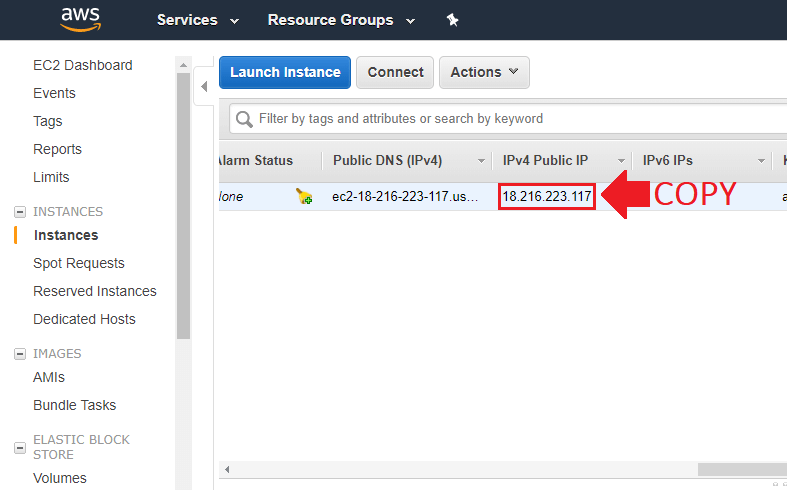
Here copy IP address of EC2. You’ll need this IP address to log into your WordPress site.
7. Log into WordPress
To log into your WordPress site, open a browser and go to your EC2 instance’s public IP address, appending “/wp-admin” to the URL e.g., http://<your-ec2-ip>/wp-admin. There enter the username and password.
Now you can access the WordPress admin panel.
8. Transfer Your Domain Name to AWS
Create a Hosted Zone
- Go to Route 53:
In your AWS console, navigate to Route 53, which manages DNS records. - Create a Hosted Zone:
Enter your domain name in “Create Hosted Zone”. This will set up a DNS zone for your domain.
Add an “A” Record
- In the Hosted Zone, click “Create Record.”
- Choose “A – IPv4 address” and enter the EC2 instance’s public IP in the Value field.
- Click “Create” to save the record.
Add a “CNAME” Record
For users accessing your site with the “www” prefix, add a CNAME record:
- Enter “www” in the Name field and select “CNAME” as the record type.
- In the Value field, enter your domain name.
- Click “Create” to save.
9. Edit Domain Name Servers
To point your domain to AWS, you’ll need to update the nameservers at your domain registrar:
- Find Nameservers:
In the Route 53 Hosted Zone, you’ll see a list of nameservers. Copy them. - Update at Registrar:
Log in to your domain registrar and update your domain’s nameservers to the ones provided by AWS.
10. Test Your Domain Configuration
After the nameserver change has propagated this can take up to 48 hours, test your website by entering your domain name in a browser. You should see your WordPress site.
11. Import Your WordPress Website
Now comes the critical part: moving your WordPress site’s content to AWS.
Install the WP Migration Plugin
- On your existing WordPress site (the one you’re transferring), install the “All-in-One WP Migration” plugin.
- From the WordPress dashboard, go to “Plugins” > “Add New” and search for “All-in-One WP Migration.”
- Activate the plugin and navigate to “All-in-One WP Migration” > “Export To” > “File.” Download the export file.
Import to Your New Site
- On your new WordPress installation on AWS, install the same “All-in-One WP Migration” plugin.
- Navigate to “All-in-One WP Migration” > “Import From” > “File” and select the export file you downloaded.
After importing, you may need to change the permalink structure. To do this, go to “Settings” > “Permalinks” and select your preferred permalink structure (e.g., Post Name).
12. Include the WWW Prefix (Optional)
To ensure your site works with the “www” prefix, use an SSH client to access your EC2 instance. Run the following commands to enable redirection:
sudo nano /opt/bitnami/apache2/conf/bitnami/bitnami.conf
Add the following lines:
apache
RewriteEngine On
RewriteCond %{HTTP_HOST} !^www\. [NC]
RewriteRule ^(.*)$ http://www.%{HTTP_HOST}%{REQUEST_URI} [R=301,L]
Restart Apache:
sudo /opt/bitnami/ctlscript.sh restart apache
Conclusion
By following these steps, you now know how to move WordPress to AWS and configure your domain and website correctly. Hosting a WordPress site on Amazon provides scalability, security, and reliability. Whether you need a strong cloud infrastructure for an expanding blog or an online store, AWS provides the tools and flexibility you need to manage your WordPress website effectively. For further assistance, you can reach Tambena Consulting anytime. Our experts will be glad to assist you.
Better uptime, faster load times, and easy scalability as your site expands are just a few advantages. For this, you can take services from our WordPress development company, or do it yourself. To help you transfer your site from WordPress to AWS we will cover all the necessary steps and answer the common question: How to move WordPress to AWS?
Can You Host a WordPress Site on AWS?
Yes, you can host a WordPress site on AWS. Among the services offered by the cloud platform is Amazon EC2, which enables you to set up a virtual server on which WordPress may run. Additionally, AWS provides a range of tools for growing and administering your website with dependability and efficiency. The flexibility to customize your server configurations and the pay-as-you-go pricing model are some of the top advantages of hosting WordPress on Amazon.
Why Move WordPress to AWS?
There are several reasons you might consider moving your WordPress site to AWS:
- Scalability:
As your website grows, AWS makes it easy to scale your server resources without downtime. - Security:
AWS offers advanced security features like firewalls, encryption, and automated backups. - Performance:
You can optimize your AWS server with caching solutions and content delivery networks (CDNs) for faster page load times and improved page visibility. - Reliability:
AWS provides high uptime, ensuring your site remains online even under heavy traffic.
Now, let’s see the steps on how to move WordPress to AWS.
Step-by-Step Guide to Moving WordPress to AWS
1. Launch an EC2 Instance
The first step in the process is to launch an EC2 instance, which acts as the virtual server for your WordPress site. Here’s how to do it:
- Access EC2 Dashboard:
Log in to your AWS account and navigate to the EC2 dashboard. - Click on Launch Instance:
This will begin the process of creating a new server instance. - Search for WordPress:
In the left sidebar of the EC2 dashboard, go to the AWS Marketplace, then to WordPress, and select”WordPress Certified by Bitnami.” - Continue with the Setup:
After reviewing the WordPress details, click the Continue button to move forward with the setup process.
2. Choose Instance Type
Once you’ve selected WordPress from Bitnami, you will need to choose the appropriate instance type. For most small to medium-sized WordPress sites, a t2.micro instance (eligible for the free tier) will suffice. Larger sites may require more powerful instance types like t2.medium or t3.large.
Click “Next” to proceed after selecting your instance type.
3. Configure Instance Details
On the configuration page, you’ll set up various options for your instance. For most setups, you can leave the default options, but here’s what to pay attention to:
- Auto-assign Public IP:
Ensure this option is selected so your WordPress site will be accessible from the web. - Other Options:
Leave these unchanged unless you have specific networking or security requirements.
After configuring, click “Next” to review the instance details.
4. Generate SSH Key and Launch Instance
In this step, you’ll generate an SSH key pair that will allow you to securely access your EC2 instance. Save the private key file on your local machine. After that, click “Launch” to start the instance.
5. Obtain WordPress Credentials
- Go to Instances:
In the EC2 dashboard, locate your new instance and click on its name. - Get System Log:
Click on “Actions,” then “Instance Settings,” and choose “Get System Log.” In the log, locate the Bitnami WordPress application password and copy it.
6. Copy External IP Address
Here copy IP address of EC2. You’ll need this IP address to log into your WordPress site.
7. Log into WordPress
To log into your WordPress site, open a browser and go to your EC2 instance’s public IP address, appending “/wp-admin” to the URL e.g., http://<your-ec2-ip>/wp-admin. There enter the username and password.
Now you can access the WordPress admin panel.
8. Transfer Your Domain Name to AWS
Create a Hosted Zone
- Go to Route 53:
In your AWS console, navigate to Route 53, which manages DNS records. - Create a Hosted Zone:
Enter your domain name in “Create Hosted Zone”. This will set up a DNS zone for your domain.
Add an “A” Record
- In the Hosted Zone, click “Create Record.”
- Choose “A – IPv4 address” and enter the EC2 instance’s public IP in the Value field.
- Click “Create” to save the record.
Add a “CNAME” Record
For users accessing your site with the “www” prefix, add a CNAME record:
- Enter “www” in the Name field and select “CNAME” as the record type.
- In the Value field, enter your domain name.
- Click “Create” to save.
9. Edit Domain Name Servers
To point your domain to AWS, you’ll need to update the nameservers at your domain registrar:
- Find Nameservers:
In the Route 53 Hosted Zone, you’ll see a list of nameservers. Copy them. - Update at Registrar:
Log in to your domain registrar and update your domain’s nameservers to the ones provided by AWS.
10. Test Your Domain Configuration
After the nameserver change has propagated this can take up to 48 hours, test your website by entering your domain name in a browser. You should see your WordPress site.
11. Import Your WordPress Website
Now comes the critical part: moving your WordPress site’s content to AWS.
Install the WP Migration Plugin
- On your existing WordPress site (the one you’re transferring), install the “All-in-One WP Migration” plugin.
- From the WordPress dashboard, go to “Plugins” > “Add New” and search for “All-in-One WP Migration.”
- Activate the plugin and navigate to “All-in-One WP Migration” > “Export To” > “File.” Download the export file.
Import to Your New Site
- On your new WordPress installation on AWS, install the same “All-in-One WP Migration” plugin.
- Navigate to “All-in-One WP Migration” > “Import From” > “File” and select the export file you downloaded.
After importing, you may need to change the permalink structure. To do this, go to “Settings” > “Permalinks” and select your preferred permalink structure (e.g., Post Name).
12. Include the WWW Prefix (Optional)
To ensure your site works with the “www” prefix, use an SSH client to access your EC2 instance. Run the following commands to enable redirection:
sudo nano /opt/bitnami/apache2/conf/bitnami/bitnami.conf
Add the following lines:
apache
RewriteEngine On
RewriteCond %{HTTP_HOST} !^www\. [NC]
RewriteRule ^(.*)$ http://www.%{HTTP_HOST}%{REQUEST_URI} [R=301,L]
Restart Apache:
sudo /opt/bitnami/ctlscript.sh restart apache
Conclusion
By following these steps, you now know how to move WordPress to AWS and configure your domain and website correctly. Hosting a WordPress site on Amazon provides scalability, security, and reliability. Whether you need a strong cloud infrastructure for an expanding blog or an online store, AWS provides the tools and flexibility you need to manage your WordPress website effectively. For further assistance, you can reach Tambena Consulting anytime. Our experts will be glad to assist you.


